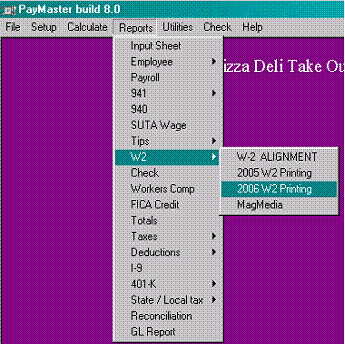
Step 1:
Now that you have created your alignment W2s you are ready to print on the actual forms. Be sure to select the current tax year W2 Printing for this years forms.

Prints to pre-printed W2 forms and the W3. You will need to a run of each of the forms separately. Enter the correct year; select which Division, or ALL. You may group by a "Separate W2 in each Division" or "One W2 per employee". To include ALL employees, or selected, by placing a check next to the employee's name.
|
Step 1:
Now that you have created your alignment W2s you are ready to print on the actual forms. Be sure to select the current tax year W2 Printing for this years forms. |
|
This screen allows you print actual W2 forms or preview the data before you commit to the actual forms.

Step 2: Select your Options and Print the Forms
|
OUTPUT : Choose: Printer or Screen
Outputting to screen is great for previewing groups of employees during the year. The preview will display up to 4 employees per page can be printed.
|
|
|
Employees: Choose: All to print all employees OR Selected to print just the selected employees Selecting an employee from the list below will automatically change this option. |
|
|
Include Deductions Owed? This option pertains to all BOX 12 deductions. Leave this unchecked to use the amount actually deducted. Check this if you have collected all deductions owed and will be giving the employee credit for both paid and owed.
|
|
|
Grouping: For multi division employers. One W2 will combine all incomes from all divisions into one W2 |
|
|
Step 3: Prepare Data The first time you run this for the year you will have prepare the data for export to the W2 forms. Once this table is created you can continue to use this dataset for each run of paper.
If the program finds an existing W2 dataset you will get this message. If you are sure that this is the correct dataset press YES or to recalculate the W2 data press NO.
Note this could take a few minutes on large companies (>500) |
|
|
|
|
Once you select the printer a progress bar will show you the status of the W2 creation and print progress. You can pause/ resume or cancel the printing process at this point. |
Hints:
· Be sure to verify your data before committing to paper.
· Reconcile your 4 Quarter’s 941 to your W3
· You can do a test run on plain paper and /or use the condensed preview style to double check each employee’s data and W3 data.
If you want just a selected employee you will have to create a new dataset.
|
If you select YES at this screen it will always use the last set of data you used.
Once the W2/W3 data is calculated you do not have to reprocess the employee info. This is real convenient when you are printing multiple sets of forms.
You MUST select NO if you are changing the selected employees or divisions or any of the options.
|
|
Related Topics